I will admit, I am not a photographer nor am I a photo editing professional. I am however a traveler who takes photos and uses some basic editing techniques to hopefully make an enjoyable viewing experience for those viewing my photos. Here are a few basic tips that I think could be useful to other fellow travelers.
Let’s talk/focus on Instagram. The filters and editing functions are quite powerful in their ability to transform an average photo into something extraordinary. But Instagram user be aware, over editing your photos can take an otherwise decent photo and turn it into garbage.

I personally do not use the built in filters but rather use the individual editing adjustments. These same adjustments can be found in your iPhone photo editing but I find it easier to work on Instagram’s platform.
Tip: If you want to edit & save a photo using Instagram but don’t want to share on your Instagram feed, turn your phone to airplane mode. When you click ‘share’ to end the edit, your photo will save to your phone but will not share on your Instagram feed.
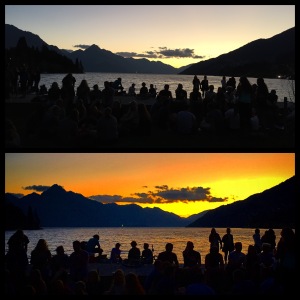
‘Saturation’: This is the first adjustment I use when seeking to adjust the colors of a photo. Saturation changes the intensity of the colors. It can bring out colors (sunsets) that don’t appear pronounced or are dull. If you adjust to the left, you will get a black/white photo. Adjust too far to the right and you will end up with a very harsh looking photo that will appear grainy with distortions. Remember that when using this adjustment in Instagram, you are adjusting all of the colors so be careful as you may inadvertently intensify a color or portion of the photo that you do not desire.

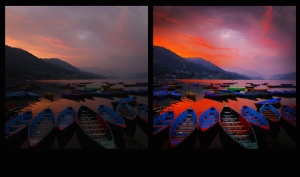
A little adjustment goes a long way so don’t over adjust the saturation (trust me, it is tempting to do).
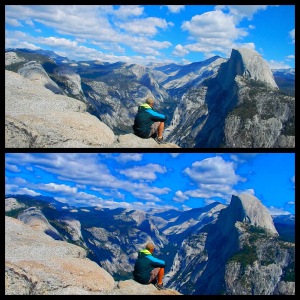
Know what your intended editing goal is before starting to edit. If you want to enhance the colors, focus on saturation first. If you want to enhance the lighting, start with shadow, contrast, highlights and brightness. Same rules apply, be gentle with your edits and play around with each one noting the effects.
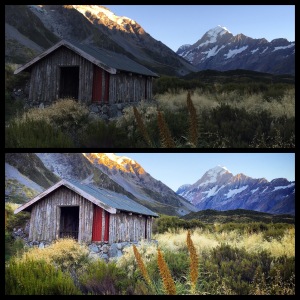
Adjusting/adding ‘vignette’ to you photos darkens the corners as if looking through a constricted lens. I have had good luck adding vignette to sunset photos as it seems to frame the focus of the scene nicely and add some additional depth to the changes of color of the sky.

I hope you find these quick tips useful and please comment if you have any additional tips and feel free to share with others! (you can also follow my own journey learning to edit photos on my Instagram account Geo’s Instagram )
Cheers!
Geo

Great article and tips! I completely agree, too much editing on a photo definitely over does it.
LikeLiked by 2 people
It really does. I just realized most of my posts are actually aimed at reminding myself not to do certain things… ha! Thanks for your thoughts 🙂
LikeLiked by 2 people
This article is perfect for me! I don’t understand anything about photo editing and this was extremely useful 🙂
LikeLiked by 2 people
Yay! Makes me happy when someone tells me I am useful 🙂 If you have any other questions let me know, always happy to help. Thanks for your comment!
LikeLiked by 1 person
Thanks for the tips, really helpful! I have done some editing that I wasn’t happy with, but wasn’t sure the reasons why, or what exactly was wrong with it-just knew it looked off! Will keep these tips in mind in the future for sure. 🙂
LikeLiked by 2 people
Thanks, really happy you were able to get something out of it. 🙂
LikeLike
Good explaining. At the moment I only ‘edit’ by cropping. 🙂
LikeLiked by 2 people
No editing can make for a truly genuine photo 🙂
LikeLiked by 1 person
Wow! Most of your editing is with saturation only? It’s actually one of the features I use the least..I’m always afraid of over doing it, funny though, your work on your photos is pretty great!
I usually correct the light in facetune and put the photo in vsco for seeing how my feed will look like on IG (it’s pretty handy); on IG I always apply the same filter, usually between 5 and 35, to give a similar tone to the feed! 😀
LikeLiked by 1 person
Sounds like you are an IG pro! Thanks for sharing these. You are correct about the over saturation, it’s quite easy to do. I realized after reading your comment that most IG feeds have a very similar feel to them, I assume because each of us uses our own unique sequence of editing. Interesting. Thanks for sharing!
LikeLiked by 1 person
What’s your IG? hehe mine is all blue-ish
LikeLiked by 1 person
@geopapp 🙂
LikeLike
found you!
LikeLike
Hi! I really like your posts and your content is awesome! Thank you so much for following Worldscene.org it is much appreciated! I started my site in hopes of creating a community of writers! Please, check out our site and see what you think! If you are interested in collaborating or maybe some featured posts? There are multiple ways to contact myself or my other administrator Abby on our Authors page!
LikeLiked by 2 people
Will do!
LikeLike
Thank you for a very helpful post. I am not on Instagram but it is on my “to do”list.
LikeLiked by 1 person
Happy that you found it helpful 🙂 Look forward to seeing your photos!
LikeLiked by 1 person
Very helpful post. Thank you!
LikeLike
This is Great I’m on Instagram @Jvintage17 I need some followers for My site (Positivemindset2016.weebly.com
LikeLiked by 2 people
followed!
LikeLiked by 1 person
Thanks For Following!!!!!!!🌎💼✈📰🚀🚨📱Be sure To Share, Tweet & Call & let someone know about Positivemindset2016.WordPress.com Do all Of Those Great Things For us.
LikeLiked by 1 person